Hi commanders!
Abyss is my favourite map on war robots so when I saw Pixonic asking to write strategy articles about it, I thought it is time to write a new post on The Art of War Robots (TAOWR).
Abyss map has been created using the idea of War Robots community, so it is a War Robots fan's map. For more details on the creation process, click here.
At the beginning, I was not a fan on tele-porters, but now I understand the benefit: that allow to make a big map smaller. A bit map is interesting as more elements, buildings, etc, but the problem is when you have your Arthur in a corner on the map, it takes ages to go to the opposite. It creates also infinite possibilities. For example Yamantau map was the most hated map because snipers wait for robots crossing the map to shoot them. So was quite static. But now the Yamantau could come back, just need to add a few tele-porters and problem solved.
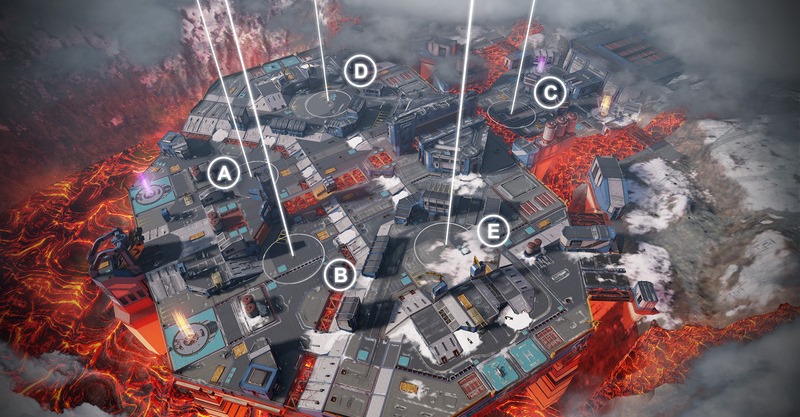
Beacons of Abyss map:
D and E are home beacons and the most difficult to capture for the opposite side. D is capture first and A second by the team on this side, while E and B are captured by the opposite team.
The Central Beacon (C)
C is the central beacon and I think the most critical beacon to capture. Why? Because near C there is 2 teleporters: 1 to go to A and 1 to go to B. The team controlling C can easily attack A and B.
Also fron C, you can easily go in the building between C D and E, and being covered against flying robots and Ao Ming, equipped with weapons 500-600m range, you can support your teammates by shooting reds fighting for A and B.
For starting robots, I use Orochi that allows me to capture C before other robots. You can also use Strider, or other fast robots. I used 500m range weapons: Avalanche that allows me to shoot either on the side of C when reds are occupying this corner of the map, trying to shoot at me or come to this beacon. There is buildings so you can stay covered when your ability is reloading. The problem sometime is when 2-3 robots coming aggressively to C beacon. In this case I have 2 solutions: the first is to stay on the C beacon, make as much damage as I can to enemies coming and when I am destroyed, I spawn with a heavy brawler such as Fenrir or Shell to keept the beacon. The second option is to run away near my home beacon and continue to shoot at reds occupying the C beacon. I tend to prefer the option 1 as controlling this beacon is critical in Beacon Rush mode.
One big danger to be aware of is that enemies will come from any direction: on the side from their starting point, from the 2 tele-porters from A or B. From below the building. So watch out of your surroundings to not be taken by surprise.
My ideal start with Orochi on this map is:
1) capture C
2) destroy robot coming to C
3) go inside the big center building in front of C
4) shoot at reds near beacons A and B and keep an eye on Beacon C.
Beacons A & B
Beacon A & B are important to control as usually the team that control A and B will win. Also these 2 beacons are close to each other. So there are usually intense fights over there.
To move between A and B you can take the tunnel to be covered from flying robots (this is also the shortest path), go via the roof which as quite a lot of covers. Or on the side in the center of the map (not advised as the most exposed place of the map.
I usually prefer the roof as this is where there are the most covers, but if I need to rush I just go straight through the tunnel.
Position for snipers
There is 3 positions I like for snipers.
1) My favourite one is at the top of the center building the one close to C and to got to A/B. I like it because it is high, have a good view on the different beacons. But there is a caveat: you are quite exposed, especially if your team does not control C. I like to go there using jumping Hawk sniping with 600m range.
2) The one on the roof of the building between A and B is good as it has a good view on both A and B beacon as well are a large view on the map. But not as good from the central high building as less high and your line of sight C, D and E is blocked by buildings. You can also be attacked quickly by a brawler from A and B. Also you are vulnerable to Shell explosions if they are in the tunnel.
3) The last one is in the corners of the map near starting points. They give a partial line of sight on C and D or E. The good things is that it is very near to the starting point so low chance that reds come too close (else your team is probably in trouble already). But for me it is too far from the action (A and B) and cannot shoot at the enemies if they are behind cover near C beacon.
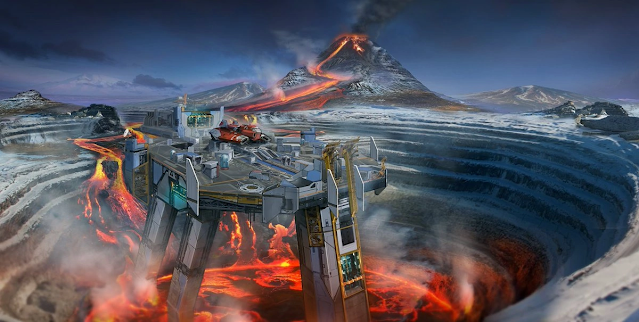
The Abyss
Another reason why I like this map so much is because it is I like maps with abysses like Castle and Carrier maps. This is so fun when you push in the abyss or water a red with your Shell or Minos. Abyss is the most dangerous map where you can fall and lost your robot. You can drop from almost all the edge of the map and on the sides of C beacon. So watch out, and be careful using jumping robots like Raven, as they can easily be pushed out of the map. So Shell and Minos are recommended for this map.


Good job bro!!
ReplyDelete👏🏼👏🏼👏🏼👏🏼👏🏼
Very clear, thank you!
ReplyDelete